Create Encounter
- Measure Health Vitals
- Filling Flowsheets
- Review Questionnaires
- Charting Types
- Chart Notes
- Sending Supplement Orders to FullScript
- Sending Electronic Rx
- Filling Procedure Codes
- Vaccination Reminder
- File For Review
- Co-Sign Chart Note
- Addendum to Charts
- Export
- Printing Rx Order, Lab Order
- Faxing Lab Order
- Adding Quick Notes
Measure Health Vitals
- When a patient arrives for the Consultation, you can measure the Health Vitals configured under the 'Settings > Encounter > Vitals' section and record it as a part of the Chart Note.
- To record the Health Vitals, select the Patient and open a new Encounter. Go to the 'Vitals' section to record the Health Vitals.

- You can also go to the Patient Dashboard, click the '+' button above, and select the Vitals option.

- Enter the Weight, Height, BMI, Temperature, BP, Pulse, and other details of the Patient.

Filling Flowsheets
To fill the Flowsheet, select the Patient and open a new Encounter. Go to the 'Flowsheet' section next to the 'Vitals' section. Select the name of the Flowsheet from the dropdown and fill in the values.

Review Questionnaires
While creating an Appointment, you would have shared any Pre-appointment Questionnaire with the Patient to obtain details on the previous medical condition. These Questionnaires are accessible from the 'Questionnaires' tab. Select the Questionnaire name to view the filled-in Questionnaire.

Charting Types
There are four different types of Charting available, viz., Quick, Brief, Comprehensive, and SOAP template. Select the appropriate type of charting based on the details to be recorded when you start an Encounter from the Patient dashboard.

Chart Notes
Once you open up a Chart Note, you will see different sections within the record to consult notes, adding Dx codes, Rx, Supplements, Vaccines, Lab Orders, etc. Fill in the details in the relevant sections to complete the Chart Note. You can either add the details instantly or from pre-defined templates you had created earlier. Only the sections that get filled up appear in the final summary.

To add a diagnostic code, click on the 'Add Dx' option. Enter a few words in the 'Diagnosis' field to search for the Dx code and add it to the chart.

Sending Electronic Rx
To send the prescribed medications to the Pharmacy electronically, click on the 'Transmit > Fax Rx' option.

Select the medications you need to e-prescribe and click on the 'Sign Rx' button. Note that only the medications that get signed can be e-prescribed.

Search for a Pharmacy or select the Pharmacy from the preferred Pharmacy list. Click on the 'Send' button to send the Fax Rx.


Once sent electronically, the medication status changes to 'eRx Sent'. The eRx can also be sent from the 'Chart Notes' section, from the Patient Dashboard.
Note 1: CharmHealth supports the electronic prescription of controlled substances (EPCS) by following the same steps described above. When prescribing CS drugs, the Providers need to additionally authenticate the prescription order through a 'Hard Token' two-factor authentication.
To know about how to subscribe for EPCS, refer to the URL https://www.Charmhealth.com/ehr/epcs.html
Note 2: Faxing Rx orders to the Pharmacy involves the same steps described above.
Filling Procedure Codes
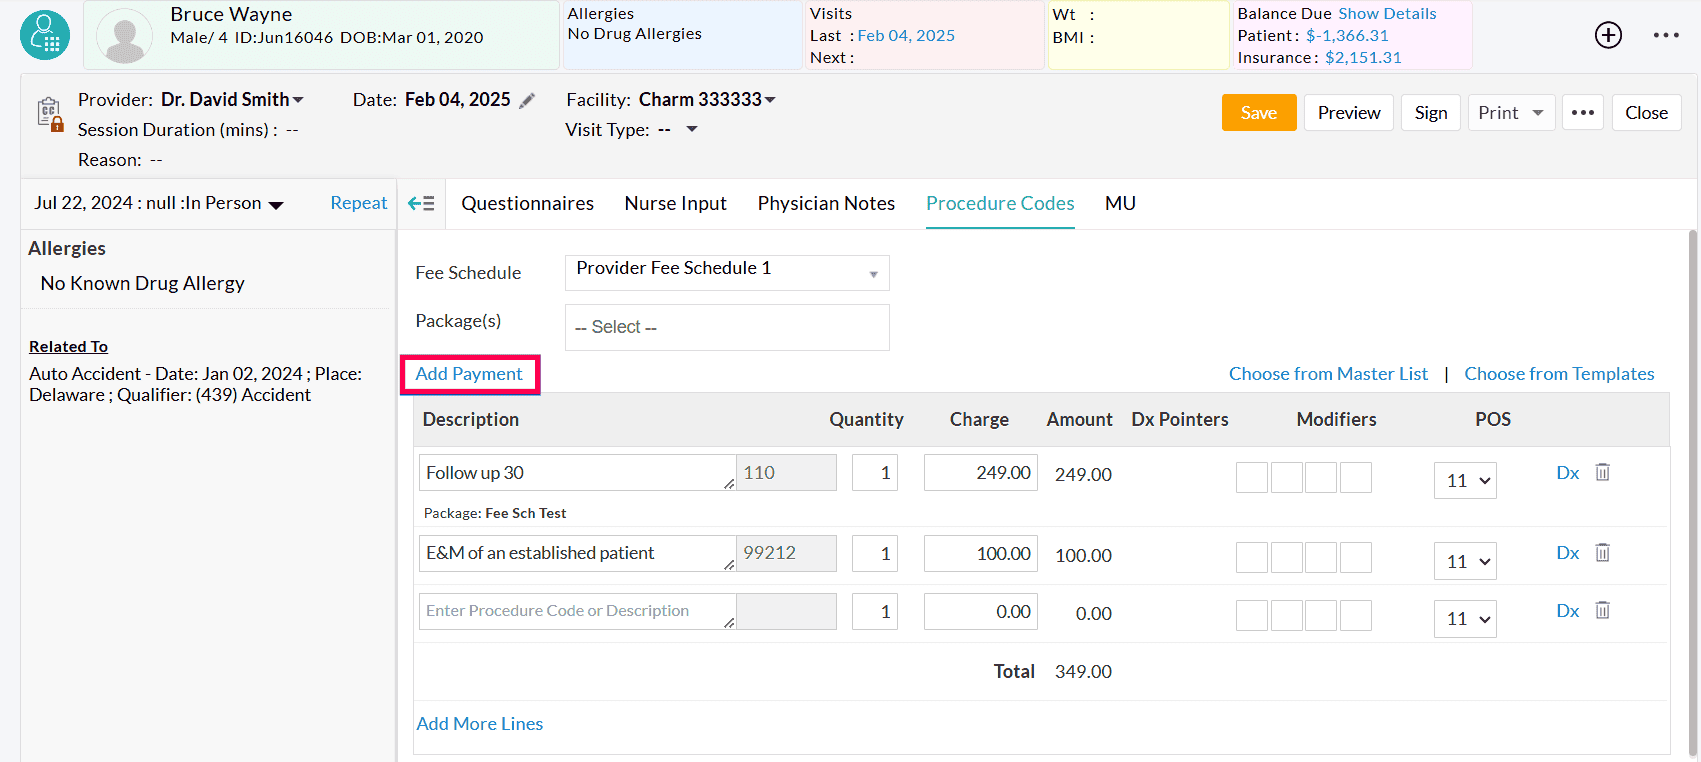
Once the Consultation gets complete, you can enter the procedure codes that you performed in the 'Procedure Codes' section. Select a 'Fee Schedule' and search the procedure codes in the 'Description' field. The pre-defined charges for the procedure codes will get populated and tagged with the Chart Note you had created. This will be helpful when you need to generate Insurance Claims.
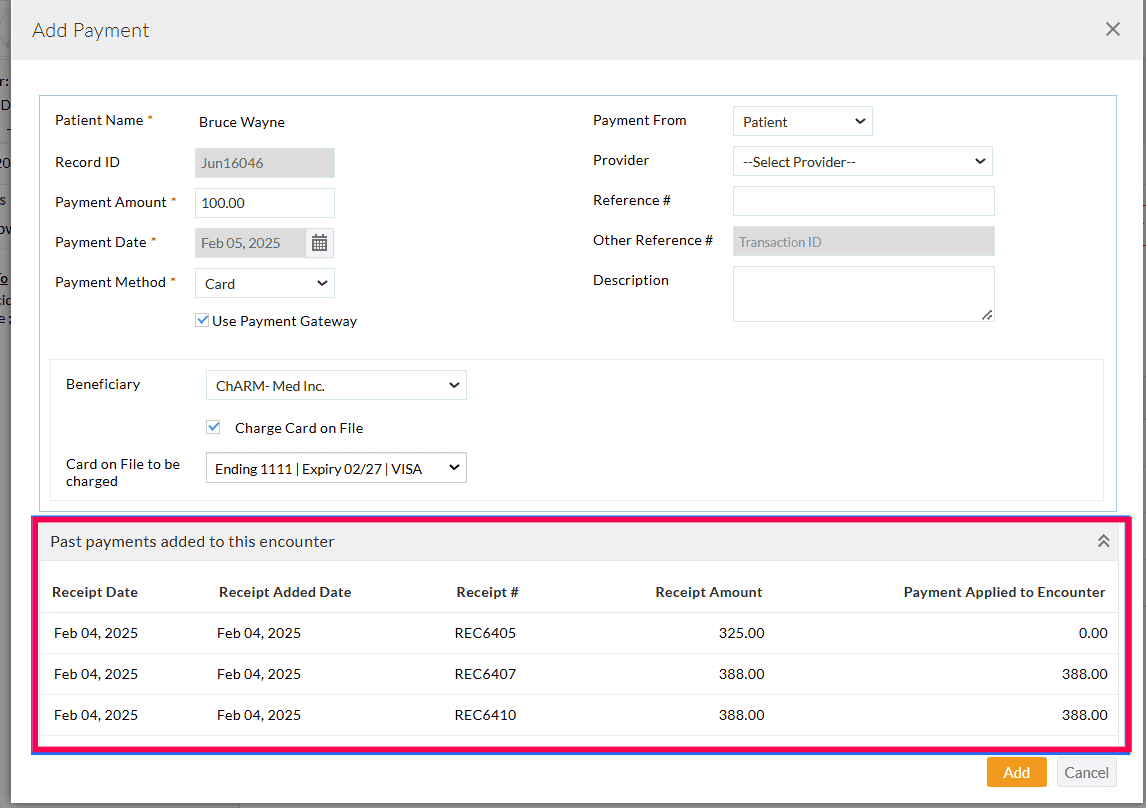
Practices can easily add payments from the Encounter section by clicking the 'Add Payment' option. While adding payment, Practices can also view all the past payments added to the Encounter, as shown in the screenshot below.


Vaccination Reminder
You can set up a reminder for the Vaccination when it is due. The Patient receives the reminder via Text Notification. Before setting up the reminder, enable the 'Vaccine Reminder Notification' option in the 'Settings > Patient > Text/Voice Notification' section.

To send a Vaccination Reminder, follow the steps given below.
- Select the Patient and go to the Patient Dashboard.
- Click on the 'Vaccines' tab and select the 'Reminders' option from the 'More Options' (...) icon.

- Enter the Vaccine name, dosage number, and due date. The reminder date will be auto-populated as configured under the Settings.

- Click on the 'Add' button to add the Vaccination Reminders. The Scheduled Reminders will appear on the right pane.
File For Review
Once you finish charting, you can file the Encounter for review with another Physician. To do this, click on the 'More Options' (...) icon and select the 'File For Review' option.


Co-Sign Chart Note
If you need your Chart Note to be signed by your Supervising Provider, you can file the Chart Note for co-signing from the 'Patient Dashboard > Encounters' section using the 'To be Co-Signed' option. On the other hand, if you get assigned as a co-signer for the Chart Note as a Supervising Provider, you can access the charts to be co-signed from the 'Chart Notes' section using the 'To be Co-Signed' Chart status.

You can either co-sign the charts individually or use the 'Co-Sign All' option to co-sign all the charts at once.

While co-signing, the co-signer can add the notes that will appear in the signed Chart Note below the co-signed status.

Once co-signed, the co-signer name will be included in the Chart Note view page and exported PDF.

Addendum to Charts
Once the chart gets signed, you cannot edit the chart to add more details. In this case, you can add an Addendum to the signed Chart Note. To add the Addendum, go to the 'Chart Notes' section and filter the signed charts using the 'Chart Status' option.

Select the Encounter to add the Addendum. Click on the 'Addendum' button to enter the additional notes.

Export
Practices Members with the necessary role privileges can click on the 'More Options' icon (3 dots) in the Encounter section to export all the patient encounters as PDF or to export the clinical data of the patient as HL7 CCDA.

Clicking on the 'Export' button within an encounter allows exporting that particular Encounter as a PDF, Surveillance Report, or HL7 CCDA.

Note: To use this feature, members should have the 'Fax/Export encounters as PDF and CCDA' role privilege under the 'Settings > Facility > Roles > Past Encounters' section.
Printing Rx Order, Lab Order
You can print the Chart Notes, Lab Orders, etc., that are part of the Encounter. From the 'Chart Notes' section, select a Chart Note and click on the 'Print' button. From the menu, you can choose to print the Chart Notes, Lab Order, Image Order, and Patient Summary.

Faxing Lab Orders
- Once the Lab orders get written in the Chart Note, click on the 'Fax' option. The following dialog opens up.

- Choose the Lab Name, Recipient Name, Fax Number, etc., and click on the 'Send' button to fax the Lab Order.
Adding Quick Notes
You can add Quick Notes to the Patient's profile. For instance, if you are making a telephonic call to your Patient, you can jot down the important notes about the call in this section. To add a Quick Note, select the Patient and go to the Patient dashboard. Click on the 'Quick Notes' menu and click on the '+ Add Note' button.

